In a world increasingly dominated by algorithms and instant gratification, there's a profound satisfaction in the deliberate stroke of a pen, the measured sweep of a brush, and the tangible texture of paper. For those drawn to the rich tapestry of Chicano culture, this holds especially true. While digital tools offer convenience, a deeper, more authentic connection blossoms when you venture Beyond the Generator: Manual Chicano Lettering Techniques.
This isn't about shunning technology; it's about reclaiming the soul of a craft, understanding its origins, and infusing your work with a personal touch that no font file can replicate. It’s a journey into the artistic heart of a vibrant culture, one stroke at a time.
At a Glance: What You'll Discover Here
- The "Why" Behind Handcrafting: Uncover the unique authenticity and cultural connection manual techniques offer over digital shortcuts.
- Decoding Chicano Lettering's Heritage: Learn about its distinctive characteristics and its deep roots in urban art, graffiti, and tattoo culture.
- Your Essential Analog Toolkit: A practical guide to the basic materials you'll need to start your manual lettering journey.
- Step-by-Step Skill Building: From fundamental strokes and layout grids to mastering ornate details and cultural symbols.
- Integrating Cultural Storytelling: How to infuse your designs with meaningful Chicano iconography.
- Common Mistakes and How to Avoid Them: Practical advice to refine your technique and artistic vision.
- A Full Workflow for Manual Projects: From concept to a polished, hand-drawn piece.
The Soul of the Stroke: Why Go Manual?
You’ve seen the allure of Chicano lettering—its bold presence, intricate flourishes, and undeniable swagger. It's a style born from resilience and self-expression, echoing through urban landscapes, lowrider art, and the permanence of tattoos since the 1940s and 50s. Today, a quick search yields countless Chicano font generators and digital typefaces, and there’s no denying their utility for certain projects. But the true spirit of this art form, its inherent duende, lives in the imperfections, the unique pressure of a hand, the slight tremble of a line, the organic flow that only manual creation can provide.
Think of it this way: a digitally generated typeface, no matter how authentic it claims to be, is a fixed entity. Every "a" is identical to the last. Every "z" is a clone. While convenient, this predictability can strip away the very essence of Chicano lettering: its hand-drawn, almost sculptural quality. When you pick up a pencil or a brush, you become a part of a legacy. You're not just applying a font; you're creating a piece of art that carries your unique energy, mirroring the raw, unfiltered expression of its pioneers. This is where cultural significance truly shines, adding depth that digital precision often glosses over.
A Deep Dive into Chicano Lettering's DNA
To truly master manual Chicano lettering, you first need to understand its foundational elements. This isn't just about aesthetics; it's about appreciating the language and history woven into every curve and line.
Chicano lettering is characterized by:
- Bold and Assertive Forms: Letters demand attention, often appearing heavy and grounded, establishing a strong presence.
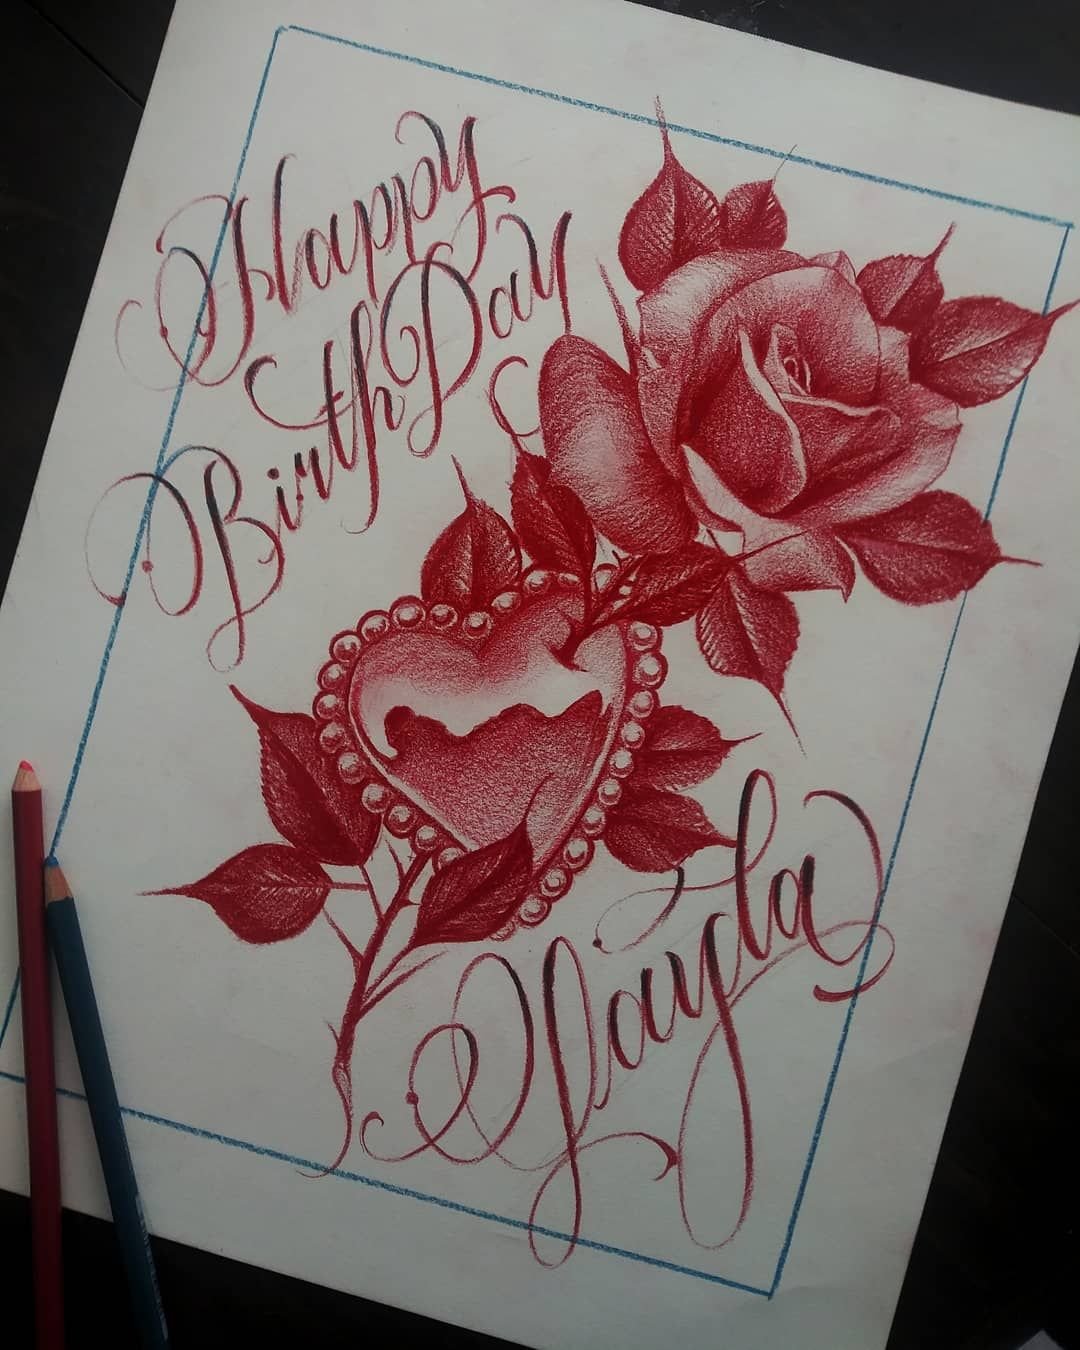
- Ornate and Intricate Details: Far from simplistic, this style embraces embellishment. Think exaggerated serifs that curl and extend, delicate filigree, and subtle textures that elevate a letter from mere character to miniature artwork.
- A Dynamic Blend of Styles: You'll frequently see a sophisticated interplay between structured block lettering (often called Old English, Gothic, or Fraktur styles) and elegant, flowing script. This contrast creates visual tension and harmony within a single piece.
- Sculptural Depth: Many designs incorporate techniques that give letters a three-dimensional, almost carved appearance, adding weight and presence.
- Roots in the Urban Canvas: This style is deeply intertwined with urban art, graffiti, and tattoo culture. Its visual language speaks of streets, lowriders, cultural pride, and personal narratives. It's designed to be impactful and legible from a distance, making it perfect for murals, car art, and the bold statements found on skin.
Understanding these characteristics is your compass. They guide your hand as you begin to translate the raw energy of Chicano culture into tangible art.
Essential Tools for the Analog Artisan
Forget complex software; your journey begins with humble, yet powerful, tools. The beauty of manual lettering is its accessibility. You likely have many of these lying around already.
- Pencils (HB, 2B, 4B): Your primary sketching tools. HB for light layouts, 2B for general drawing, and 4B for darker, softer lines and shading during the preliminary stages. A mechanical pencil can be great for fine details.
- Paper: Start with simple copy paper for practice, but invest in good quality smooth paper (like Bristol board or cardstock) for finished pieces. It handles ink better and allows for cleaner lines.
- Rulers & T-Squares: Essential for establishing baselines, x-heights, cap-lines, and ensuring consistency in letter height and spacing.
- Erasers (Kneaded and Vinyl): A kneaded eraser lifts graphite without damaging the paper, while a vinyl eraser is excellent for cleaner, precise removal of pencil lines before inking.
- Fineliners/Technical Pens (0.1mm to 0.8mm): These provide consistent, crisp lines, perfect for outlines and intricate details. Brands like Micron, Staedtler, or Copic offer various tip sizes.
- Brush Pens (e.g., Tombow Fudenosuke, Pentel Brush Pen): Excellent for learning the thick-and-thin strokes characteristic of script lettering. They teach you pressure control and flow.
- Broad-Edge Markers or Calligraphy Pens: For practicing the block letter styles, especially those with a Gothic or Fraktur influence. Think chisel-tip markers.
- India Ink & Brushes: For the most authentic and expressive work. A good quality round brush (sizes 00 to 4) and a flat brush (sizes 2 to 6) will offer versatility. This requires more practice but yields incredible results.
- Tracing Paper/Lightbox: Invaluable for refining designs without constantly erasing your original work. It allows you to overlay new ideas or clean up previous sketches.
Start simple. You don't need everything at once. Begin with pencils, paper, and a ruler, then gradually add fineliners and brush pens as you gain confidence.
Mastering the Fundamentals: Your First Strokes
Learning manual Chicano lettering is a process of disciplined practice, keen observation, and embracing the "imperfection" that makes handcraft so special.
Studying the Masters, Not Just Copying
Before you even touch a pen, immerse yourself. Look at classic Chicano art, tattoo flash, lowrider murals, and historical photographs. Pay attention to how letters are formed, how they interact, and the overall composition. What makes them feel Chicano? Is it the boldness, the specific type of serif, the way shadows are cast? Don’t just copy; dissect and understand. This foundational research is crucial for developing an authentic voice.
The Grid is Your Friend (Initially)
While Chicano lettering often appears free-flowing, especially in script, a solid foundation requires structure.
- Establish Baselines: Draw two horizontal lines—your main baseline and a cap-line (for the top of capital letters) or x-height (for the top of lowercase letters). This ensures consistent letter height.
- Guide Lines: Add vertical lines to help maintain consistent width and ensure your letters aren't leaning too much.
- "Pillows" for Block Letters: For robust block styles, lightly sketch an outer boundary for each letter before drawing the actual form. This helps maintain consistent weight and spacing.
Start with large letter sizes on your paper to get comfortable with the forms before shrinking them down.
Basic Block & Script Shapes: The Building Blocks
- Block Lettering: Focus on constructing letters out of simple geometric forms first—squares, rectangles, circles. Then, gradually introduce the iconic serifs and bold strokes. Pay attention to negative space within and between letters.
- Script Lettering: This is all about flow and connection. Practice basic calligraphic strokes: upstrokes (light pressure, thin line), downstrokes (heavy pressure, thick line). Focus on connecting letters smoothly, paying attention to the angles and consistent slant. Don't worry about perfection; aim for rhythm.
Remember the advice from the ground truth: Chicano lettering is often a mix of script and block. Practice how these two styles can coexist and complement each other in a single design.
Embracing Exaggeration and Ornamentation
This is where the personality of Chicano lettering truly emerges.
- Exaggerated Serifs: Beyond simple terminals, Chicano serifs often sweep, curve dramatically, or form sharp, almost blade-like points. Practice different serif styles—forked, rounded, pointed—and how they integrate with the main letterform.
- Flourishes and Swashes: These are extensions of letters that add dynamism and elegance. Think about how a tail of an 'R' can extend and curl, or how a 'G' might have an elaborate loop. Practice these independently, then integrate them. Ensure they enhance, not detract from, legibility.
- Intricate Details: Small decorative elements—dots, lines, tiny crosses, internal shading patterns—can be added within the letters or as part of the overall composition. These are often added during the inking and refinement stages.
Crafting Your "Signature" Style
While you’ll study traditional styles, the goal isn't to be a copy machine. It’s to internalize those principles and let your own hand translate them. Embrace the imperfections inherent in hand-drawn techniques. A slight variation in a curve, a unique pressure point—these are the hallmarks of a human touch. Your practice sheets will become a visual diary of your evolving style.
Bringing in the Culture: Symbols and Storytelling
Chicano lettering is a narrative art form. It's not just about forming letters; it's about embedding meaning and cultural resonance. The ground truth mentions incorporating symbols like crosses, roses, or religious imagery. This is where your personal connection to the culture or your respect for it shines through.
Consider integrating elements such as:
- Roses: Symbolizing beauty, love, and sometimes sorrow, often rendered with intricate petals.
- Crosses and Religious Imagery: Reflecting faith and spiritual heritage, often stylized with ornate details.
- Skulls (Calaveras): A powerful symbol of mortality, remembrance, and the celebration of life, particularly prominent in Día de los Muertos traditions.
- Lowrider Cars: These aren't just vehicles; they are rolling canvases of Chicano artistry and pride. Integrating subtle lines or an overall aesthetic that hints at their iconic curves can be very impactful.
- Pre-Columbian Motifs: Depending on the specific context, ancient Mesoamerican patterns or symbols can be woven in.
When incorporating these elements, think about how they interact with your lettering. Do they frame the text? Are they subtly integrated into the serifs or flourishes? Or do they stand as bold, accompanying visuals? The key is respectful and intentional integration, making sure the symbols add depth rather than appearing as mere decorative add-ons.
Beyond the Basics: Advanced Manual Techniques
Once you're comfortable with basic letterforms, you can push your manual work further, adding dimension and polish that truly set it apart.
Layering and Depth: Creating that 3D Pop
Many impressive Chicano lettering pieces feature a distinct 3D effect.
- Outline and Drop Shadow: Start by outlining your main letterform. Then, choose a light source (e.g., top-left). From each corner of your letter, draw a short, parallel line extending in the direction opposite your light source. Connect these lines to create a "shadow" effect.
- Internal Shading: Beyond the drop shadow, you can add internal shading within the letterforms themselves to give them a more rounded, metallic, or carved appearance. Use lighter and darker tones to suggest volume.
- Overlapping Elements: Experiment with having parts of your lettering or accompanying imagery overlap. For instance, a rose might appear to pass behind one letter and in front of another, creating visual depth. This is a common technique in urban art and tattoo design.
Shadows and Highlights: Adding Dimension
Mastering light and shadow transforms flat letters into dynamic forms.
- Consistent Light Source: Always decide where your imaginary light source is coming from and stick with it. This consistency is crucial for believable dimension.
- Hard vs. Soft Shadows: Hard, sharp-edged shadows can suggest a solid, weighty object, while softer, diffused shadows create a gentler, more atmospheric feel.
- Highlights: Don't forget highlights! A thin line or small dot of white (or a lighter color) along the edges closest to your light source can make letters truly pop and appear shiny or metallic.
Color Theory in Chicano Lettering
While often associated with black and white, color plays a significant role.
- Traditional Palettes: Rich, deep colors like maroon, forest green, navy blue, and gold are common, often paired with crisp white outlines. These hues evoke a sense of tradition and gravitas.
- Modern Adaptations: Don't shy away from experimenting. Bright pops of teal, purple, or even neon can add a contemporary edge, especially when balanced against more traditional lettering forms.
- Gradation and Blending: Manual techniques allow for beautiful color gradients within letters or shadows, adding fluidity and visual interest that's harder to replicate perfectly with basic digital fills.
Distress and Texture: The Worn-Out Charm
To give your lettering a truly authentic, street-art feel, consider adding intentional distress or texture.
- Rough Edges: Instead of perfectly clean lines, let your ink bleed slightly or create a subtle "chipped" edge effect.
- Gritty Fills: Use stippling (dots), cross-hatching, or subtle smudging with graphite or ink to create a textured fill within your letters.
- Simulated Wear: Think about how lettering ages on a wall or a car. Fading, subtle cracks, or areas where the "paint" seems to have peeled away can add immense character.
Common Pitfalls and How to Sidestep Them
Even seasoned artists encounter challenges. Being aware of common mistakes can help you refine your process.
- Over-Ornamentation: While intricacy is key, too many flourishes can make a piece look cluttered and illegible. Every detail should serve a purpose, enhancing rather than overwhelming the letterform.
- Inconsistent Letterforms: One 'A' looking different from another 'A' in the same word is a common beginner error. Use your guide lines, practice muscle memory, and be diligent in checking consistency. Tracing your own work can help you identify these discrepancies.
- Ignoring Cultural Context: Applying Chicano lettering purely as an aesthetic without understanding its origins or the symbols you're using can feel inauthentic or even disrespectful. Research, learn, and apply with reverence.
- Rushing the Process: Manual lettering is meditative. Haste leads to sloppiness. Take your time, sketch lightly, refine, and only commit with ink when you're confident. Enjoy the journey of creation.
- Lack of Negative Space Consideration: The empty space around and within your letters is just as important as the letters themselves. Good negative space creates balance and readability.
From Sketch to Shine: A Workflow Blueprint
Here’s a practical step-by-step process for approaching a manual Chicano lettering project:
- Concept & Research: What's the message? What cultural elements will you incorporate? Gather visual references (photos, historical art, existing lettering).
- Thumbnailing & Layout: On scrap paper, quickly sketch many small versions of your idea. Focus on overall composition, word breaks, and the general flow. Which words will be script, which block? Where will symbols go?
- Rough Pencil Sketch (Loose Layout): On your good paper, lightly sketch the chosen thumbnail idea. Establish baselines and guide lines. Draw the basic skeleton of your letters. Don't press hard; this is just a framework.
- Refined Pencil Sketch (Tight Layout): Using a lightbox or tracing paper, refine your rough sketch. Add the serifs, flourishes, and details. Correct proportions, spacing, and consistency. This is where the specific character of each letter truly comes to life. Erase and redraw as many times as needed.
- Inking (Outlines First): With your fineliner or brush, carefully ink the main outlines of your letters and any prominent details. Take your time, maintaining steady pressure. For thick strokes, you'll often draw two lines and fill the space in between.
- Adding Depth & Fills: Once the main outlines are dry, add your drop shadows, internal shading, and any textured fills. If using color, apply it now.
- Detailing & Highlights: Use smaller pens or brushes for intricate details. Add highlights with a lighter ink or paint pen.
- Erase Pencil Lines: Once all ink is completely dry, gently erase any visible pencil lines with a kneaded or vinyl eraser.
- Review & Refine: Step back. Does it convey your message? Is it balanced? Are there any minor touch-ups needed? A fresh eye often spots areas for improvement.
When to Use What: Manual vs. Digital Enhancements
It’s important to understand that manual and digital aren't mutually exclusive; they can be complementary. Digital generators, like Our Chicano Lettering Generator, are incredibly useful for quick mock-ups, exploring countless font variations, or for projects where speed and uniformity are paramount (e.g., website graphics, quick social media posts, or initial client presentations). They provide a foundation, a starting point for inspiration.
However, manual techniques excel where:
- Authenticity is Key: For tattoos, custom murals, gallery art, or bespoke branding, the unique imperfections and human touch are irreplaceable.
- Deep Cultural Connection is Desired: Hand-drawn work inherently carries more gravitas and respect for the art form's heritage.
- True Originality is Paramount: A generator can only output what's programmed. Your hand, guided by skill and intuition, can create something truly unique, bespoke to your vision.
- The Process is Part of the Art: For many, the meditative act of creation, the smell of ink, the feel of paper, is as rewarding as the final product.
Think of generators as convenient tools, but manual techniques as the true craftsmanship that defines the enduring legacy of Chicano lettering. You might even start with a generator to get a basic idea, then print it out and use it as a rough guide to re-draw and embellish manually, adding your unique flair.
Frequently Asked Questions (FAQs)
Do I need to be a skilled artist to start learning manual Chicano lettering?
Absolutely not! While existing drawing skills are a bonus, enthusiasm and dedication are far more important. Many start with no prior experience. Focus on consistent practice, learning the fundamental strokes, and building muscle memory. Everyone starts somewhere.
What's the best paper for Chicano lettering?
For practice, basic copy paper is fine. For finished pieces, look for smooth paper designed for ink, such as Bristol board (plate finish is very smooth), or heavy-weight drawing paper (around 90-100lb or 200-270gsm). This prevents ink feathering and allows for crisp lines.
How long does it take to learn manual Chicano lettering?
Learning the basics can take weeks, but mastering the nuances and developing your unique style is a lifelong journey. Consistent practice (even 15-30 minutes daily) is more effective than infrequent long sessions. Patience and persistence are your best allies.
Can I combine manual and digital techniques?
Yes, and many artists do! You can sketch your lettering manually, then scan it into a digital program to refine, add color, or create vector versions. This hybrid approach leverages the best of both worlds: the organic feel of hand-drawn work with the flexibility of digital editing.
What if my letters don't look perfect?
Embrace it! The beauty of manual lettering, especially Chicano styles, lies in its hand-drawn nature. Minor inconsistencies or "imperfections" are what give it character and prove it's an authentic, human creation. Focus on consistency rather than sterile perfection.
Your Journey Begins: Embracing the Hand-Drawn Legacy
Venturing beyond the generator isn't just about learning a new skill; it's about connecting with an art form that carries deep cultural weight and a rich history. It's about slowing down, honoring the craft, and infusing your work with a piece of yourself. Each stroke you make, each curve you meticulously draw, becomes a personal statement, a tribute to the resilience and vibrant expression of Chicano culture.
So, gather your tools. Clear your space. Put on some inspiring music. And let your hand, guided by history and your own creative spirit, begin to weave stories, one beautifully crafted letter at a time. The legacy of Chicano lettering awaits your touch.